
Everything you need to know about collecting, managing, and showcasing customer reviews with epicSnap.
#
BigCommerce FAQs #
Create BigCommerce API keys for epicApps
In order to use epicApps please follow the directions below and send Epic the API keys you created at the end of this process.
**Note – You must be logged into your BigCommerce as the store owner for this to work.1. Login to your BigCommerce website as the store owner.
For Example: www.yourWebsite.com/manage2. Click Settings on the left-hand side menu, towards the bottom, and then click API Accounts.
3. Now click the blue button in the upper left and then click Create V2/V3 API Token
4. In the name text field, name this API token: epicApps v1 (you can also see the image below)
5. Now click the following buttons below. (you can also see the image below)
Content: modify
Checkout Content: modify
Customers: modify
Customers Login: login
Information & Settings: modify
Marketing: modify
Orders: modify
Order Transactions: read-only
Create Payments: None
Get Payment Methods: None
Stored Payment Instruments: None
Products: modify
Themes: modify
Carts: modify
Checkouts: modify
Sites & Routes: modify
Channel Settings: None
Channel Listings: None
Storefront API Tokens: manage
Storefront API Customer Impersonation Tokens: manage
Store Logs: read-only
Store Inventory: modify
EXAMPLE:
6. Once you have the name entered and permission buttons clicked to blue, like in the image above, click Save.
7. A file will be downloaded to your computer and you now need to click Done.
8. Attach that file that was just downloaded to an email to Epic and email it back to your contact person at Epic. If you would rather open the file, copy the content, and paste it into an email to Epic, that works too.
9. Finally, when you email us, let us know which email address you want us to use as your admin login, when it comes to the new epicApps dashboard.
Once Epic gets your email with your new API keys we’ll get to work.
– Thanks, Team Epic
How to upload a video in your BigCommerce Site?
Login to your BigCommerce Site and go to Settings > File access (WebDAV). Once done, kindly follow the article below on how to use WebDAV.
Support Article for WebDAV: Click here!
WordPress FAQs #
How do I create a new page? How do I customize the slug/permalink?
To create a new Page, log in to your WordPress.
Find the Pages menu in the dashboard > click Add New option to begin writing a new Page.
Next, add the title of the page. Click the Add Title text to open the text box where you will add your title.To customize the slug/permalink, click the gear icon on the upper right corner beside
the Publish button > navigate to Permalink and type in the slug.
If you are using the Classic Editor, the Permalink is located just below the Title field. Simply click the Edit button to customize it.How do I add an admin user?
To add an admin user to your WordPress site:
- From the WordPress Dashboard, go to Users.
- Click Add New > fill out the field and set the role to Administrator.
- At the bottom of the form, click Add New User.
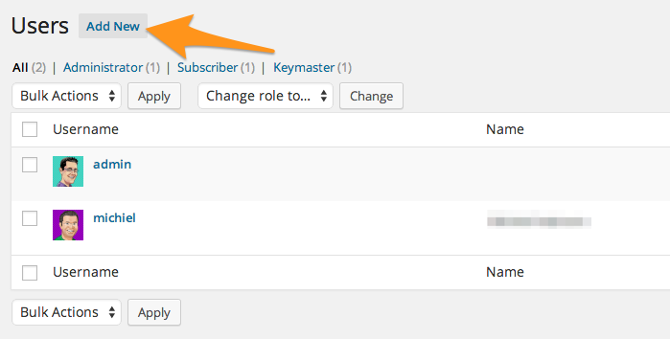
If you’re not sure which role you should assign to the user, click here to learn more about them.
goLoyalty Getting Started #
What is goLoyalty?
goLoyalty is a rewards and store credit program that lets customers earn rewards based on their purchases. These rewards can be promoted through pop-out messages, text snippets, and automated emails to help increase repeat purchases and customer retention.
How do I access the goLoyalty app?
After logging in to epicApps, go to: Apps → Website Marketing → goLoyalty → Rewards
This opens the App Overview page, where you can review information about goLoyalty or start configuring your rewards.
Where can I get help inside the app?
Each page includes a Get Help button. The App Overview also includes a Get Support section that links you to assistance whenever needed.
Reward Setup #
What’s the difference between Basic and Advanced rewards setup
Basic uses one fixed reward rate for all purchases (for example, 1¢ per $1 spent).
Advanced lets you create multiple tiers, exclude products or customer groups, and set limits per tier.
Can I switch between Basic and Advanced setup?
Yes. Each setup mode saves its settings separately. You can switch between them at any time without losing your previous configuration.
Where do I set exclusions for products or customer groups?
Exclusions are available in Advanced setup and apply across all tiers.
See the detailed guide: Exclude products or groups.
What are reward tiers?
Reward tiers let you offer different reward percentages based on how much a customer spends (for example, higher rewards for larger orders).
See the detailed guide: Advanced Setup
Can reward tiers overlap?
No. Reward tiers must have distinct ranges. Overlapping tiers may cause incorrect reward calculations or system errors.
What is a reward limit?
A limit sets the maximum store credit a customer can earn within a tier, even if they spend more than the tier range.
Example:
10% back with a $20 limit.
Customer spends $300 → they receive $20, not $30.Can I edit or delete a reward tier?
Yes. You can update or remove tiers anytime.
Deleted tiers cannot be recovered.
Storefront Display #
What is the rewards pop-out message?
A floating message on your storefront that promotes your rewards program.
Where can the pop-out message appear?
- Homepage
- Product Pages
- Checkout Page
You can also choose whether it appears on the bottom-left or bottom-right of the screen.
Can I customize the pop-out message design?
Yes. You can update colors, layout options, and add custom CSS if needed.
Can I customize messages for logged-in and logged-out customers?
Yes. goLoyalty allows separate messages for:
- Customers who are not logged in
- Customers who are logged in
Each version can have different text, sections, and formatting.
What are merge tags and how do they work?
Merge tags automatically insert customer or store details into messages (for example, customer name or reward percentage).
Merge tags must not be edited or renamed, or they may not display correctly.
What is a text snippet?
A small message shown on product or checkout pages to inform customers about earning rewards.
Where can text snippets be displayed?
- Product pages
- Checkout page
You can choose one or both locations.
Can I control where the snippet appears on the product page?
Yes. Advanced users can specify a CSS class and choose whether the snippet appears above or below that element.
Can I customize messages for logged-in vs logged-out customers?
Yes. Similar to pop-out messages, text snippets can be customized separately for logged-in and logged-out customers.
Why can’t I see the pop-out on my store?
If the pop-out isn’t appearing, it’s usually related to display settings, page placement, or browser caching.
Follow the step-by-step guide here: [Fix pop-out display issues]
Why is the balance not showing for my customer?
Balances only appear when certain conditions are met, like login status, eligibility, and when rewards are set to be given.
Walk through the checks here: [Fix missing reward balance]
Emails & Notifications #
What types of rewards emails does goLoyalty send?
goLoyalty supports:
- Store Credit Order Confirmation emails
- Store Credit Monthly Reminder emails
Emails are only sent to customers who have store credit available.
Can I customize the rewards emails?
Yes. You can:
- Change the email header color
- Edit the subject line and email body
- Use merge tags for personalization
How often are rewards emails sent?
- Order confirmation emails can be sent 24 hours after each order or disabled
- Monthly reminder emails can be sent once a month or disabled
How can I test rewards emails?
Each email section includes a Send Test Email option so you can preview the email before sending it to customers.
How do I manage unsubscribed customers?
Go to: Emails → Customers Who Have Opted Out
You can view the list and remove customers who have requested to opt back in.
⚠️ Only remove customers who have explicitly requested to re-subscribe.
Can I track if customers opened rewards emails?
Yes. The Analytics page shows:
- Date sent
- Email type
- Customer name and email
- Whether the email was opened
A blue eye icon means the email was opened; a gray eye icon means it was not.
Why didn’t my customer receive an email?
Email delivery can depend on several factors such as:
- whether rewards were available
- timing of the send schedule
- or if the customer has unsubscribed
Here’s how to troubleshoot it: [Fix email delivery issues]
Rewards & Orders #
When are rewards credited to customers?
You can choose which order statuses trigger rewards, such as Shipped, Completed, or others depending on your store’s workflow.
Can I select more than one reward trigger?
Yes. Multiple order statuses can be enabled at the same time.
How do I turn rewards on or off?
Go to Rewards → Settings and use the main toggle:
- ON activates rewards
- OFF pauses rewards without deleting your setup
⚠️ Rewards will only go live once this toggle is enabled and settings are saved.
Do rewards expire?
No. Store credit earned through goLoyalty does not expire.
Can customers use rewards with discount codes?
Yes. Store credit can typically be applied alongside discount codes.
If your store has additional checkout restrictions, those rules may affect how rewards and discounts combine.
Can rewards be refunded or reversed?
Yes — this is handled in BigCommerce.
If store credit has already been given and an order is later canceled or refunded, you can manually adjust the customer’s balance from the BigCommerce control panel.
For step-by-step instructions, see BigCommerce documentation:
What happens if I change my reward rate later?
Updating your reward settings only affects future purchases.
Any store credit that customers have already earned will remain exactly as it is. New rates apply the next time an order qualifies for rewards after you save your changes.
Can customers transfer rewards to another account?
No. Store credit is tied to the customer account that earned it and cannot be transferred or shared with another user.
Account & Administration #
What happens if I disable goLoyalty?
Disabling goLoyalty pauses your rewards program.
Shoppers will stop earning new store credit, and rewards messages will no longer appear on your storefront. Your configuration and existing customer balances remain saved.
You can enable the program again anytime and continue where you left off.
Will uninstalling the app remove reward data?
No. Uninstalling goLoyalty removes it from your storefront, but your configuration and customer reward history remain saved.
If you reinstall the app later, you can continue from where you left off
popCards Getting Started #
What is popCards?
popCards lets you display announcements, promotions, signup forms, and other messages directly on your storefront. You can use Pop Cards to promote offers, collect email subscribers, share updates, and encourage customers to take action.
How do I access popCards?
From your BigCommerce Admin, go to Apps → Website Marketing → popCards, then select popCards from the app menu.
How do I create a Pop Card?
Open the Pop Cards List View page and click Add New. Follow the setup process to choose your Pop Card type, display location, layout, and design.
What’s the difference between Quick Message and Opt-In Pop Cards?
Quick Message Pop Cards are designed to display announcements, promotions, and calls-to-action.
Opt-In Pop Cards include a form that allows visitors to submit information such as their email address, helping you grow your subscriber list.
Pop Card Setup #
Where can I display my Pop Card?
You can choose to display your Pop Card on:
- Every Page
- Home
- Checkout
- Custom Page
Can I show a Pop Card on specific pages only?
Yes. Choose Custom Page and add the page URLs where you want the Pop Card to appear.
Can I choose where the Pop Card appears on the screen?
Yes. Placement settings allow you to position your Pop Card in different areas of the screen, such as the top, center, bottom, left, or right side.
Can I control when my Pop Card appears?
Yes. You can choose when a Pop Card appears by using display triggers such as:
- Immediately
- After Time
- When Scrolled Down
- When User Tries to Leave
Can I choose who sees my Pop Card?
Yes. You can target:
- All Visitors
- New Visitors Only
- Returning Visitors Only
- Logged-In Customers
How often will visitors see my Pop Card?
You can choose how frequently the Pop Card appears:
- Every Visit
- Once per Hour
- Once per Day
- Once per Week
- Once per Month
Design & Customization #
Can I customize the design of my Pop Card?
Yes. You can customize your Pop Card’s layout, text, colors, buttons, images, icons, animations, and styling.
Can I customize text, buttons, and colors?
Yes. Most Pop Card layouts allow you to customize headings, body text, button labels, fonts, colors, and other visual settings.
Can I add animations to my Pop Card?
Yes. popCards includes several animation options, including Fade In, Slide, Zoom, Bounce, Flip, and more.
Can I customize the background and styling?
Yes. Depending on the layout you choose, you can customize background colors, accent colors, borders, width, opacity, and other styling options.
Opt-In Forms & Thank You Confirmation #
What can I customize in the Opt-In form?
You can customize:
- Email field text
- First name field text (if available)
- Fonts
- Colors
- Corner styles
- Field sizes
What happens after someone submits the form?
You can choose what happens after a visitor signs up:
- Show a thank-you message
- Redirect them to another page
- Send a thank-you email
- Use a combination of these options
Can I show a thank-you message after sign-up?
Yes. You can display a confirmation message directly inside the Pop Card after the visitor submits the form.
Can I redirect subscribers to another page?
Yes. You can automatically redirect subscribers to any page by entering the destination URL in the Thank You Confirmation settings.
Can I send an automatic thank-you email?
Yes. Enable the Also Send a Thank You Email option and customize the email subject and message.
Do I need to send a thank-you email?
No. Sending a thank-you email is optional. You can display a thank-you message, redirect subscribers to another page, send an email, or use any combination that supports your campaign goals.
Managing Pop Cards #
How do I turn a Pop Card on or off?
Use the Visibility toggle in the Pop Cards List View page. Turning a Pop Card off hides it from your storefront but does not delete it.
How do I turn a Pop Card on or off?
Use the Visibility toggle in the Pop Cards List View page. Turning a Pop Card off hides it from your storefront but does not delete it.
Can I edit a Pop Card later?
Yes. Click Edit from the Actions column to update any settings, design elements, or behavior options.
How do I preview a Pop Card?
Click Preview from the Actions column to see how the Pop Card will appear on your storefront before publishing.
Can I duplicate a Pop Card?
Yes. Click Duplicate to create a copy of an existing Pop Card. This can save time when creating similar promotions, campaigns, or announcements.
Can I use the same Pop Card more than once?
Yes. You can duplicate an existing Pop Card and modify it for a new campaign. This is often faster than creating a new Pop Card from scratch.
How do I delete a Pop Card?
Click Delete from the Actions column and confirm the action. Deleted Pop Cards cannot be recovered.
Pop Cards Best Practices #
Can I have multiple Pop Cards active at the same time?
Yes. You can enable multiple Pop Cards at once.
However, displaying too many Pop Cards can overwhelm visitors and reduce engagement. Review active Pop Cards regularly and keep only the Pop Cards that support your current goals.
How can I create more effective Pop Cards?
Keep your message clear, concise, and relevant to the page where it appears. Use attention-grabbing headlines, clear calls-to-action, and designs that match your storefront branding.
Why should I preview my Pop Cards before publishing?
Previewing helps you confirm that text, images, buttons, colors, and overall layout appear as expected before visitors see them.
Account & Support #
Where can I get help?
If you need help with popCards, visit the epicApps Help Center for guides, tutorials, FAQs, and troubleshooting resources.
How do I contact support?
If you need additional assistance, contact the epicApps Support Team through the support options available in the Help Center.
epicSnap Getting Started #
What is epicSnap?
epicSnap helps you collect, manage, and showcase customer reviews for your store. It makes it easy to request reviews from customers, display them on your website, and build trust with future shoppers.
Learn more: Overview
How does epicSnap work?
epicSnap sends reviewequests after your customers receive their orders. Depending on how you set up your store, review requests can be sent automatically or manually.
You can also customize your review emails, display reviews on your website, and manage customer feedback from the Admin App.
Learn more: Overview
What platforms does epicSnap support?
epicSnap currently supports BigCommerce and can also be set up for other e-commerce platforms.
What’s the difference between the Admin App and the Mobile Web App?
The Admin Web App is where you set up and manage epicSnap. Here you can customize review emails, manage reviews, configure widgets, and adjust your settings.
The Mobile Web App is mainly used for sending review requests manually. It also lets you add manual orders, capture or upload photos, and manage review requests on the go.
Learn more: Overview
How do I access epicSnap?
You can access the epicSnap Admin App by signing in to your epicApps account.
To use the epicSnap Mobile Web App , sign in using your Shop Phrase.
Learn more: Access the App
How do I choose between Autopilot and Manual setup?
Choose Autopilot if you want epicSnap to send review requests automatically after your selected order event.
Choose Manual if you’d like to decide when each review request is sent and optionally include a photo of the customer’s order.
Learn more: Choose Your Review Setup
Can I switch between Autopilot and Manual later?
Yes. You can switch between Autopilot and Manual at any time from your review request settings.
Choose the setup that best fits how you’d like to send review requests. Your changes will apply to future review requests after you save your settings.
Learn more: Setup
Can I use the Mobile Web App even if my store is using Autopilot?
Yes. The Mobile Web App is available whether your store is using Autopilot or Manual setup.
If your store is using Autopilot, you can still use the Mobile Web App to add manual orders, such as phone or in-store orders that weren’t placed through your online store.
Once the order is added, the review request will follow your Autopilot settings, including when it’s sent and whether Reminder Emails or Image Replies are enabled.
Learn more:
- Manual vs. Autopilot
- Setup
epicSnap Reviews #
Where can I view customer reviews?
Open the Reviews section in the Admin App to view all reviews collected through epicSnap.
Learn more: Manage Customer Reviews
Can I filter reviews?
Yes. You can filter reviews by star rating (1–5 stars) to quickly find the feedback you’re looking for.
Learn more: Filter Reviews by Star Rating
Can I reply to customer reviews?
Yes. You can reply directly to customer reviews from the Reviews section.
Learn more: Reply to Reviews
Can I hide reviews from my website?
Yes. You can hide or show individual reviews, or update multiple reviews at once using the bulk visibility option.
Learn more: Show or Hide Reviews
Should I hide negative reviews?
Not always. A healthy mix of positive and constructive reviews can help build trust with shoppers. Consider hiding only reviews that are spam, inappropriate, or unrelated to the order.
Learn more: Best Practices for Managing Reviews
Review Requests & Emails #
Can I customize review request emails?
Yes. You can customize your review request emails, including the subject line, email content, and both the versions sent with and without an order photo.
Learn more: Set Up Review Request Emails
What are Merge Tags?
Merge Tags automatically insert information such as your customer’s name, store name, or review link into your emails.
Learn more: Merge Tags
Can I send test emails?
Yes. Use the Send Test Email feature to preview your review request emails before sending them to customers.
Learn more: Emails Being Sent
Can I test epicSnap before sending review requests to customers?
Yes. You can send test emails to preview your email templates, or send yourself a Manual review request to experience the complete customer journey before going live.
Learn more: Test & Verify
Can customers unsubscribe from review emails?
Yes. Customers can unsubscribe from review emails, and you can manage the opt-out list from the Admin App.
Learn more: Customers Who Have Opted Out of Reviews Email
Can I resend a review request?
Yes. You can resend review requests from the Sent tab in the epicSnap Mobile Web App.
If the original review request included an order photo, you can also update the photo before resending it.
Learn more: Sent
Can I edit a scheduled review request?
Yes. Scheduled review requests can be edited before they are sent.
You can update the scheduled send date or remove the request if it’s no longer needed.
Learn more: Scheduled
Does epicSnap support SMS review requests?
Not yet. SMS review requests are currently in development and will be available in a future update.
Stay tuned!
Can I send reminder emails?
Yes. You can enable a follow-up email to remind customers who haven’t submitted a review yet.
Learn more: Setup
Photos & Image Replies #
Can I include a photo in my review request?
Yes, but only when sending review requests manually through the epicSnap Mobile Web App.
Learn more: Send a Review Request (Manual Setup)
Can recipients upload photos?
Yes. If you’ve enabled Image Replies, recipients can upload a photo that will be attached to the original review request.
Learn more: Setup
When should I use image replies?
Image replies work especially well for gift orders and products where seeing the delivered item adds value. They help create a more personal review experience and give customers an opportunity to share what was received.
Learn more: Customer Experience
Website & Widgets #
Can I display reviews on my website?
Yes. epicSnap lets you display customer reviews on your website using its built-in review page and review widgets.
Learn more: Manage On-Site Widgets
What is the Rate Order page?
The Rate Order page is where customers leave their star rating and written review after clicking your review request email.
Learn more: Customer Experience
Can I customize the look of the Rate Order page?
Yes. You can customize the logo, colors, buttons, and star ratings to match your store’s branding.
Learn more: Design
What happens after a customer submits a review?
After submitting a review, customers will see a Feedback Message based on the rating they selected.
If you’ve connected your Google Reviews page, customers who leave a positive rating can also be invited to continue to your Google Business Profile and share their review there.
Learn more: Customer Experience
What is the Reviews widget?
The Reviews widget displays customer reviews directly on your storefront, helping visitors see recent feedback while they browse your products.
Learn more: Orders Review Carousel
epicSnap Settings #
Can I connect Google Reviews?
Yes. Add your Google Reviews link to invite customers who leave a positive review to continue to your Google Business Profile.
Learn more: General Settings
What is a Shop Phrase?
A Shop Phrase is the login credential used to access the epicSnap Mobile Web App. Create a unique phrase that’s easy for your team to remember but difficult for others to guess.
Learn more: Shop Phrase
Can I change my Shop Phrase later?
Yes. You can update your Shop Phrase at any time from the Admin App.
After changing it, use the new Shop Phrase the next time you sign in to the epicSnap Mobile Web App.
Learn more: Shop Phrase
Can I customize epicSnap to match my brand?
Yes. You can customize your email colors, Rate Order page colors, buttons, star ratings, and logo so epicSnap matches your brand.
Learn more: Design
How do I create a dedicated Reviews page?
Enable Website Integration in your settings to create a dedicated page where customers can browse your store’s reviews.
Learn more: Website Integration
eLocate Getting Started #
What is eLocate?
eLocate is a store locator that helps customers find the store location that best matches their needs and location.
You can organize your store locations, define the areas they serve, and give customers an easy way to search for relevant locations from your storefront.
Learn more: Overview
How do I access eLocate?
You can access eLocate from your epicApps dashboard.
After opening eLocate, you can manage your store locations, Global Filters, and Store Locator settings from the app.
Learn more: Access the App
Can I add multiple store locations?
Yes. You can add and manage multiple store locations in eLocate.
Each store location can have its own details, coverage areas, and assigned Store Filters.
Learn more: Set Up Your Store Locator
Store Locations #
What information can I add to a store location?
You can add information such as:
- Store name and contact details
- Logo
- Address and map location
- Business hours
- Holiday notice
- Store coverage
- Store Filters
Learn more: Store Locations
Can I edit a store location after creating it?
Yes. You can edit a store location at any time and update its information, coverage, or assigned Store Filters.
Learn more: Manage Store Locations
Can I hide a store location without deleting it?
Yes. You can turn a store location off to hide it from your Store Locator without deleting it.
Turn it back on when you want the location to appear again.
Learn more: Manage Store Locations
Can I delete a store location?
Yes. You can permanently delete a store location from the Stores page.
Because deletion is permanent, make sure you no longer need the location before confirming the deletion.
Learn more: Manage Store Locations
Can I fine-tune a store’s map location?
Yes. You can adjust the map location by clicking the map to place the pin where you want it.
You can also zoom the map in or out to help you place the pin more precisely.
Learn more: Address
Global Filters & Store Filters #
What are Global Filters?
Global Filters are the categories and values you create for customers to use when searching for stores.
For example, you can create categories for services, certifications, or business types, then add the values customers can select.
Learn more: Global Filters
What’s the difference between Global Filters and Store Filters?
Global Filters define the filter categories and values available in your Store Locator.
Store Filters let you assign those existing filter values to individual store locations.
For example, you might create a Services Global Filter with values such as Delivery and Pickup, then assign the appropriate values to each store using Store Filters.
Learn more: Global Filters, Store Filters
Do I need to create Global Filters before assigning Store Filters?
Yes. Create your Global Filters and their values first, then assign the appropriate values to each store location through Store Filters.
Learn more: Global Filters
Can I choose which filter categories appear for a store?
Yes. Each filter category has its own Visibility setting in Store Filters.
Visibility is On by default. Turn it Off for categories that don’t apply to that store.
If Visibility remains On, the filter category can still appear on the store result card even when the store has no applicable information for it.
Learn more: Store Filters
What is a Featured Global Filter?
A Featured Global Filter is highlighted in your Store Locator and appears at the top of the filter information shown on store results.
Only one Global Filter can be featured at a time. If you feature another filter, the previously featured filter loses its featured position and the new one takes its place.
The color shown to customers follows your Store Locator’s Accent Color setting.
Learn more: Set a Global Filter as Featured, Design
Can I change the order of my Global Filters?
Yes. eLocate lets you sort your Global Filters in the Admin App and control the order of filter values customers see in the Store Locator.
To sort Global Filters in the Admin App:
- On the Global Filters page, click the Filter Category column heading to switch between ascending (A → Z) and descending (Z → A) order.
- This only changes how the filters are displayed in eLocate. It does not affect the order customers see in the Store Locator.
To reorder filter values for customers:
- On the Global Filters page, find the Global Filter you want to update and click Edit.
- Open the Build Your Global Filter Values tab.
- Drag the Move button for a filter value to the position where you want it to appear.
- Update your changes.
The order you set for the filter values is reflected in the Store Locator.
The featured Global Filter remains at the top of the Global Filter list in the Admin App, regardless of the sort order.
Learn more: Sort Global Filters, Add a Global Filter
Store Locator Features #
Can customers search for stores by distance?
Yes. You can enable the Radius Filter to let customers narrow store results by distance.
Learn more: Radius Filter
Can I customize the text shown in the filter pop-up?
Yes. You can customize the text displayed in the Filter Pop-up, including the heading, button text, and button link.
Learn more: Custom Text on Filter Pop-up
What are Extra Tabs?
Extra Tabs let you add up to three customizable tabs to your Store Locator.
You can use them to share additional information such as promotions, FAQs, special services, or other helpful content.
You don’t have to use all three tabs. Leave any unused tabs blank.
Learn more: Extra Tabs
Can I add icons to Extra Tabs?
Yes. You can add an icon to an Extra Tab using Font Awesome.
When choosing an icon, select from the Classic or Brands icon sets supported by the setup.
Learn more: Extra Tabs
Store Locator Design #
Can I customize the appearance of my Store Locator?
Yes. You can customize your Store Locator’s colors, Search Header text, and background options.
Learn more: Design
Can I use my brand colors in my Store Locator?
Yes. You can use your brand’s color codes when customizing the Store Locator.
You can enter supported color values such as HEX or RGBA codes in the available color settings.
Learn more: Design
Can I change the Search Header?
Yes. You can customize the Search Header text and its appearance, including its background options.
Learn more: Design
Google Maps & Website Integration #
Do I need a Google Maps API key?
Yes. A Google Maps API key is needed to connect Google Maps to your eLocate Store Locator.
You can add an existing key or use the Google Maps API Key Guide to create one.
Learn more: Google Maps API Key
How do I connect Google Maps to eLocate?
Add your Google Maps API key under Settings → General, then click Save.
If you don’t have an API key yet, use the Google Maps API Key Guide provided in eLocate to create one.
Learn more: Google Maps API Key
Can eLocate automatically create a Store Locator page on my website?
Yes. Website Integration can automatically create a dedicated Store Locator page on your BigCommerce website.
You can choose the page name and URL in eLocate before saving the integration settings.
Learn more: Website Integration
Can I change the Store Locator page directly in BigCommerce?
No. To keep your Store Locator working properly, update the page name or URL through eLocate rather than changing them directly on your BigCommerce website.
After making changes in eLocate, check your website to verify that the changes have taken effect.
Learn more: Website Integration
How long does it take for Website Integration changes to appear?
Changes may take up to a minute to take effect.
After saving your settings, check your website to verify that the Store Locator page has been updated.
Learn more: Website Integration
eLocate Customer Experience #
What will customers see on the Store Locator page?
Customers will first see your Store Locator page with its Search Header and search field.
After they search, they can see matching store locations, available filters, and store details based on how you’ve set up your Store Locator.
Learn more: Customer Experience
What information can customers see about a store?
Customers can see the store information you’ve provided, such as its address, business hours, contact details, and other information available through your Store Locator settings.
The information shown depends on what you’ve added and enabled for each store.
Learn more: Customer Experience
Can customers filter their store results?
Yes. Customers can use the filters you’ve created and assigned to your store locations to narrow their search results.
Optional features such as the Radius Filter can provide additional ways to refine results.
Learn more: Customer Experience
If you still have questions or need help setting up eLocate, our support team is always here to help.


